All Wheel Drive Control Module J492
Removing
Special tools, testers and auxiliary items required
• 4 mm Allen Wrench
• Torque Wrench (V.A.G 1783)
• Drip Tray for VAS 6100 (VAS 6208)
- Turn off the ignition.
- Disconnect the connectors - 1 and 2 - from the upper control module.

- Place a drip tray under the final drive.
- Remove the bolts - arrows -.
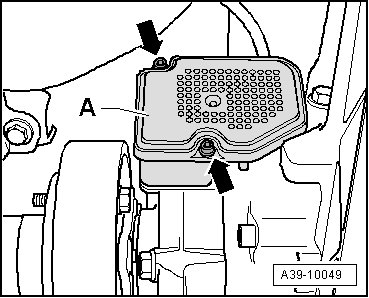
- Carefully remove the control module - A -.
- Remove the cover (- item 3 - in the => [ All Wheel Drive Control Module J492 ] All Wheel Drive Control Module J492) from the Haldex clutch housing if necessary. Continue holding the valve - arrow -.
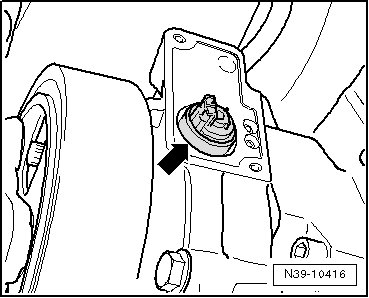
- Cover the Haldex clutch control valve - arrow - with a cloth; grab the valve body with pliers and remove it.
Installing
Install in the reverse order of removal. Note the following:
• The valve seals have different internal diameters.
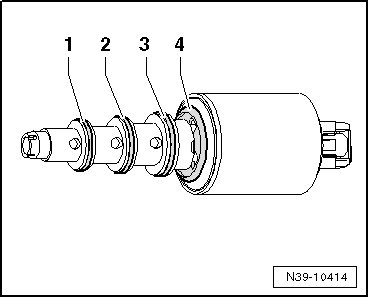
• - 1 - internal diameter - 10 mm
• - 2 - internal diameter - 11 mm
• - 3 - internal diameter - 12 mm
• - 4 - seal on the valve body
- First, coat the seal - 1 - with high performance gear oil for Haldex coupling and mount it on the Haldex clutch control valve.
- Then the seals - 2, 3 and 4 -.
- Press the centering lips (quantity 4) of the seal - 4 - into the groove.
- Place the new cover - 2 - on the control module - 1 -.
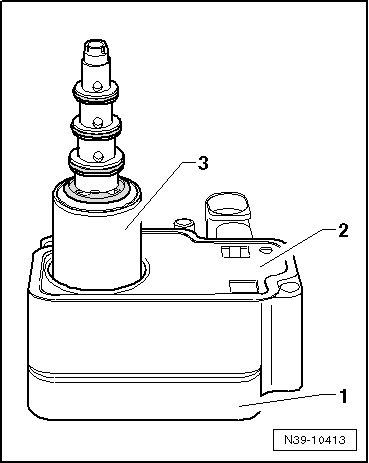
• The cover fits in one position only.
- Insert the Haldex clutch control valve - 3 - into the control module - 1 -.
• The valve only fits in one position.
- Carefully position the control module - A - and tighten the bolts - arrows - to specification, see - item 2 - in the => [ All Wheel Drive Control Module J492 ] All Wheel Drive Control Module J492.
- Check the oil level in the Haldex clutch. Refer to => [ Haldex Clutch Oil Level, Checking or Filling ] Haldex Clutch Oil Level, Checking or Filling.